Search
Putting the TSE into operation
Requirements
To connect the TSE with Lodgit Desk, you’ll need the additional module KassensichSichV TSE.
To activate the additional module, open Lodgit Desk & go to the menu item Administration > Additional modules > KassenSichV TSE.
Click on “Purchase licence now” in the window that opens.
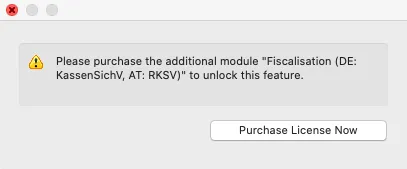
You will then be redirected to our shop. Here you can purchase the additional module by clicking on the button “Select” at the interface “Interface: Fiscalisation (DE: KassenSichV, AT: RKSV)”.
After purchasing the add-on module, you still have to update your Lodgit licence under File (Windows) or File (macOS) > Software Activation > via button “Update licence info”.
In order to be able to use the additional module “POS security”, you also need TSE hardware (USB stick, receipt printer or server from Epson), learn more about which products are available.
Default settings
Installation
To operate the TSE, certain drivers or an update of the firmware of your receipt printer or TSE server must be installed. The TSE can only be controlled by Lodgit Desk if the corresponding device settings have been made by you in advance. The preliminary steps differ depending on the TSE hardware you are using.
Please select your TSE hardware and carry out the necessary steps:
- Make sure that the TSE USB stick is correctly connected to your machine.
- Install the Epson TSE driver, which you can download from our website:
Epson TSE Driver Setup 1.0.8 64 Bit
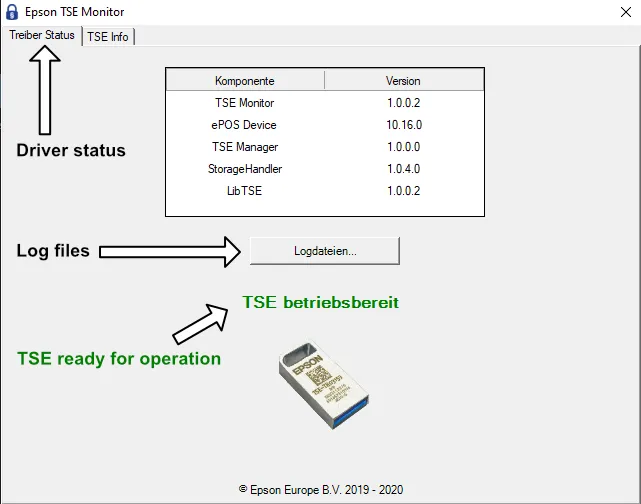
Epson TSE Driver Setup 1.0.8 32 Bit - When the driver is successfully installed, a green lock icon will appear in your Windows system tray. Here you can view the details of your TSE and the driver status.
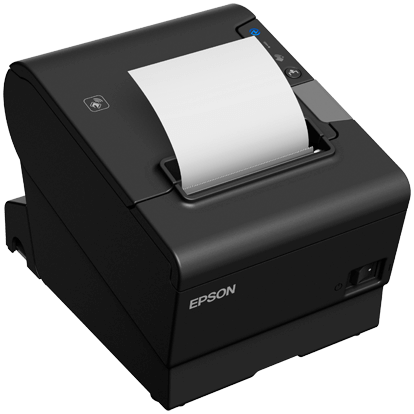
Epson currently equips the following printer models with a TSE:
TM-m30

- Insert the TSE (micro-SD card) into your machine. This is done by inserting the TSE into the TM-m30 fiscal upgrade kit. You will then need to insert the upgrade kit itself into one of the USB slots on the back of your TM-m30.
Note: Depending on the batch from Epson, this step may have already been done for you. - Make sure that your machine has been properly setup according to the manufacturer’s instructions and is connected to your network. For setup, the receipt printer must always be connected to your network by cable, even if you later connect it to the network via Wi-Fi.
- Perform a firmware update for your printer. You can either use software for the Microsoft Windowsoperating system or an app (Epson “TM Utility”) for the Android or iOS operating systems.
TM-88VI
- Insert the TSE (micro SD card) into your device. This is done by inserting the TSE into the slot provided. This is located on the back of the receipt printer under a screwed cover.
Note: Depending on the batch, this step may have already been carried out for you by Epson. - Make sure that your machine has been properly installed according to the manufacturer’s instructions and is connected to your network via cable – even if you plan to connect the receipt printer to your network via WLAN later.
- Perform a firmware update for your printer. You can either use software for the Microsoft Windowsoperating system or an app (Epson “TM Utility”) for the Android or iOS operating systems.
Note: The steps listed here refer to the TSE server variant from Epson with three USB slots, which you can obtain from us. If you have a TSE server with eight slots, similar information can be found on the page of the TSE server manufacturer SEH.
- Follow the steps according to the manufacturer’s instructions (Steps Hardware / Software Installation) to set up the unit in your network.
- Make sure that the TSE USB stick is inserted.
- Update the firmware to ensure that your TSE server is up to date. You can either use software for the Microsoft Windows operating system or an app (Epson “TM Utility”) for the Android or iOS operating systems.
After successful installation, you should see the TSE set up on the web interface of your TSE server:

Find out the IP address of your TSE
Epson always accesses the TSE via a network interface. Therefore, it is necessary to find out the IP address of your TSE.
- For a USB TSE, the IP address is localhost. If this does not work, enter the IP address 127.0.0.1.
- To find the IP address of the network TSE (receipt printer or server), first make sure that your machine is properly connected to your network.
- Usually a router assigns an IP address to your TSE hardware. Check within your router configuration which hardware is present in the network. With most routers, you can display in the administration interface which devices are currently connected to which IP.
- The Epson receipt printers print out their IP address received via DHCP at start-up.
- Epson’s published app for Android or iOS can help you discover Epson devices (and their IP address) on your network.
If possible, assign a fixed IP to your TSE in the router.